Ghost-Ball Aiming: Stop Aiming at the Contact Point
A clear six-step aiming method, the geometry behind it, and a measurable drill for building a more reliable shot picture.
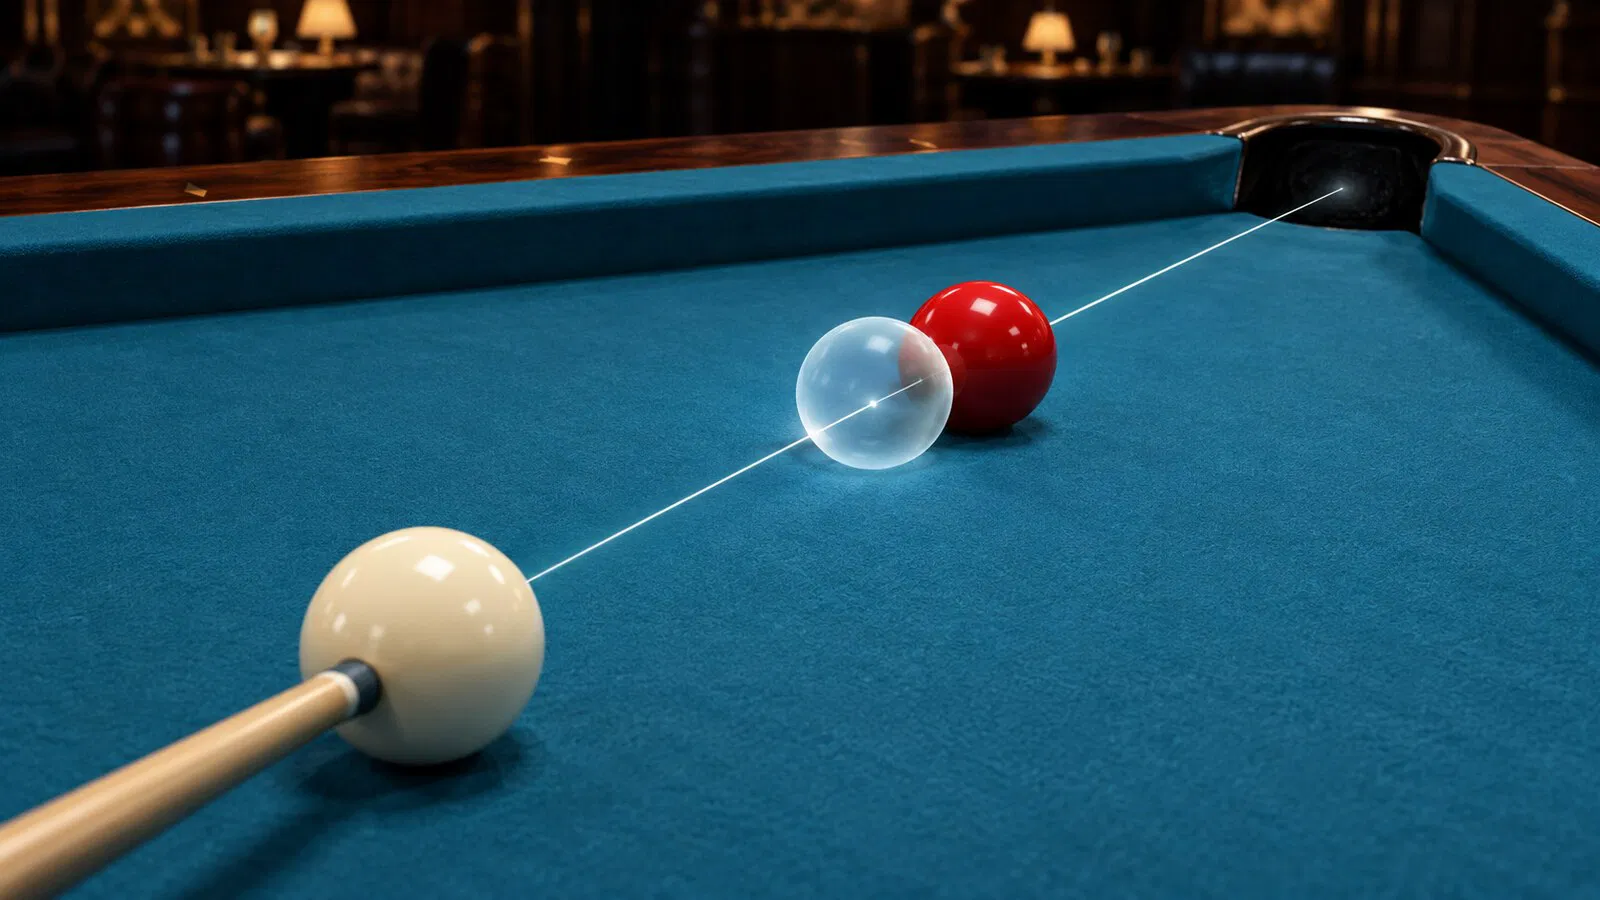
Ghost-ball aiming fixes one of pool's most common visual mistakes: the contact point on the object ball is not the point toward which the center of the cue ball should travel. Instead, the player aims the cue-ball center toward the center of an imaginary cue ball positioned at impact.
That imaginary ball is the ghost ball. It creates a simple geometric picture of where the real cue ball must arrive to send the object ball toward the pocket.
Why Can Aiming Directly at the Contact Point Cause a Miss?
Imagine a line from the center of the pocket through the center of the object ball. The point where that line exits the back of the object ball is the desired contact point.
That point describes where the two ball surfaces must meet. It does not describe the location of the cue-ball center. Because a pool ball has a radius, its center must remain one radius behind the contact point at impact.
If a player points the cue-ball center directly at the surface contact point, the cue ball arrives too far into the object ball. On a cut shot, the result is often a hit that is too full or “too thick.”
What Are the Three Lines in Ghost-Ball Geometry?
What is the target line?
The target line runs from the object-ball center toward the chosen pocket entry. In a simple open shot, it may pass through the center of the pocket. A tighter angle may require a more precise entry point within the pocket opening.
What is the contact point?
The contact point is the location on the object-ball surface opposite the target direction. It marks where the cue ball and object ball should touch.
What is the aiming line?
The aiming line runs from the real cue-ball center to the ghost-ball center. This is the center-to-center direction the player uses for the basic geometric model.
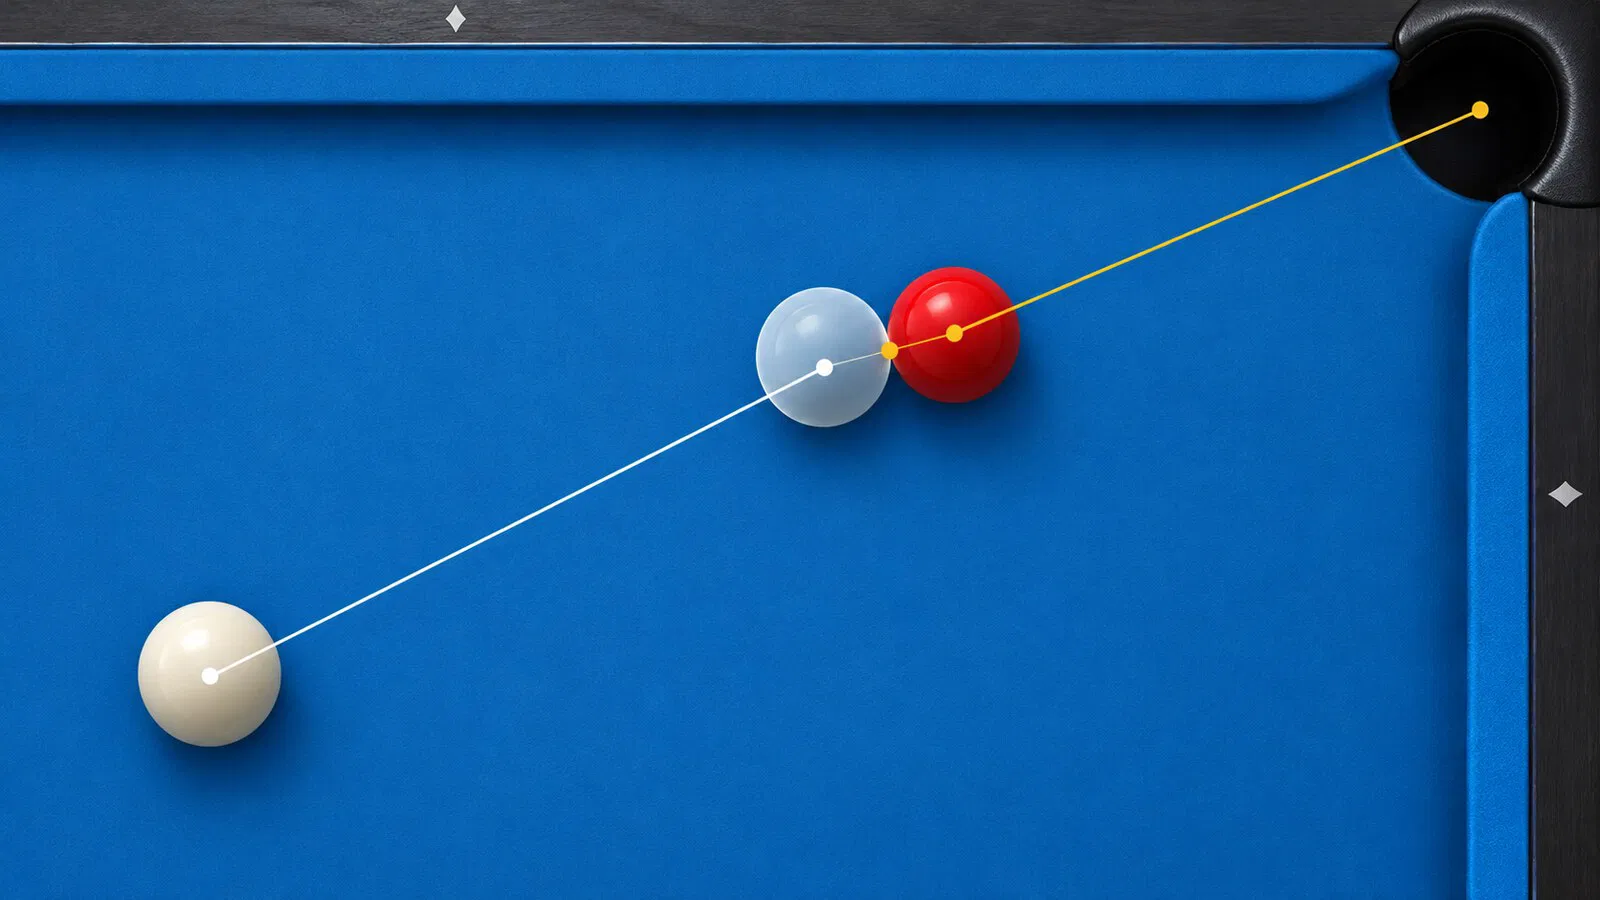
The white line ends at the ghost-ball center; the gold line carries the object ball toward the pocket. The small dot between the balls is the surface contact point. Original diagram created for Billiard News.
| Reference | Begins At | Ends At | What It Tells the Player |
|---|---|---|---|
| Target line | Object-ball center | Pocket entry | Desired object-ball direction |
| Contact point | Surface of object ball | Surface of cue ball at impact | Where the balls touch |
| Aiming line | Real cue-ball center | Ghost-ball center | Where the cue-ball center must travel |
How Do You Aim with a Ghost Ball in Six Steps?
Step 1: Choose the object-ball path
Stand behind the intended object-ball line and decide where the ball should enter the pocket. Select the target line before trying to solve the cue-ball line.
Step 2: Locate the contact point
Visualize the target line passing from the pocket through the object-ball center and continuing out the back. Where it exits the object-ball surface is the geometric contact point.
Step 3: Place the imaginary cue ball
Imagine a second cue ball touching the object ball at that contact point. It must be the same size as the real cue ball. Its center lies on the extension of the target line, exactly one ball diameter from the object-ball center.
Step 4: Find the aiming line
Draw a visual line from the real cue-ball center to the center of the ghost ball. Do not replace the ghost-ball center with the surface contact point.
Step 5: Enter the stance on that line
Finish the visual decision while standing. Then step into the stance so the head, bridge, cue, and delivery support the selected line.
Bending down too early and searching for the angle from the shooting position can make the shot picture unstable.
Step 6: Start with center ball
Use a center-ball hit at medium speed while learning the geometry. Sidespin adds squirt, swerve, and changes in throw, making it harder to identify why the shot missed.
How Is Ghost-Ball Aiming Different from Contact-Point Aiming?
The methods are related, but their visual references are different.
| Feature | Ghost-Ball Aiming | Contact-Point Aiming |
|---|---|---|
| Main reference | Center of an imaginary cue ball | Surface contact point on object ball |
| Primary purpose | Locate cue-ball center at impact | Identify where the ball surfaces meet |
| Useful image | Full ball-sized target | Small point on the object ball |
| Common error | Ghost ball placed at wrong size or distance | Cue-ball center aimed directly at contact point |
| Alternative | Fractional-ball or overlap picture | Contact-point-to-contact-point parallel lines |
Dr. Dave also describes contact-point-to-contact-point and parallel-lines visualization. In that approach, the player identifies corresponding points on both balls and translates the relationship into the required line of aim. It can help players who find a full imaginary ball difficult to visualize.
When Is the Basic Ghost-Ball Model Incomplete?
Ghost-ball geometry begins with ideal ball contact. Real shots also involve friction, speed, spin, cloth conditions, and cue delivery.
How does cut-induced throw change the shot?
Friction between the balls can push the object ball away from its purely geometric line. The amount varies with cut angle, cue-ball speed, sliding or rolling state, ball cleanliness, and spin.
The basic beginner model ignores throw. An advanced ghost-ball picture moves the required impact position enough to compensate for the expected throw.
What do squirt and swerve change?
When sidespin is applied, the cue ball can deflect away from the cue direction immediately after impact with the tip. This is squirt. With cue elevation and cloth interaction, its path can then curve; this is swerve.
Throw changes the object-ball result at ball contact. Squirt and swerve change the cue-ball route to the required ghost-ball position. That is why center-ball practice should come first.
Why does speed matter?
Speed changes how long friction acts and how much the cue ball can curve before impact. It also changes pocket acceptance. Aiming practice is easier to interpret when speed remains consistent across a group of shots.
Which Fractional-Ball References Help Visualize Cuts?
Fractional-ball hits describe how much the cue ball overlaps the object ball at impact. Dr. Dave's May 2026 Aim Visualization Techniques article gives three useful reference pictures.
| Ball-Hit Fraction | Approximate Cut Angle | Visual Reference |
|---|---|---|
| 3/4-ball hit | About 15° | Fairly full overlap |
| 1/2-ball hit | About 30° | Cue-ball center aimed near object-ball edge |
| 1/4-ball hit | About 45–50° | Thin overlap |
These are reference images, not universal adjustments. They help a player classify the shot picture, while speed and throw may still change the precise effective aim.
How Does the 24-Shot Ghost-Ball Drill Work?
Use four contact pictures and three cue-ball distances:
- Nearly full hit.
- 3/4-ball hit.
- 1/2-ball hit.
- 1/4-ball hit.
Play each at short, medium, and long distance, then repeat every combination twice.
4 hit fractions × 3 distances × 2 attempts = 24 shots.
Keep the conditions controlled:
- Use center ball.
- Maintain a similar speed.
- Locate the ghost-ball center before bending down.
- Keep the same pre-shot routine.
- Change only one variable between test groups.
- Record the direction of every miss.
Removable position markers can help reset the balls during practice. Do not use an object as an aiming marker during competition when the applicable rules prohibit it.
How Should You Record the Results?
Use a simple code after every shot.
| Code | Meaning |
|---|---|
| Made | Object ball pocketed on the intended line |
| Thick | Too much of the object ball was hit |
| Thin | Too little of the object ball was hit |
| Possible throw | Contact looked correct but friction may have altered the object-ball line |
| Stroke error | Cue delivery or body movement changed the hit |
Twenty-four attempts will not produce laboratory data, but they reveal patterns that one memorable miss cannot.
What Does Each Miss Pattern Suggest?
What if most misses are thick?
The player may be aiming the cue-ball center at the contact point instead of the ghost-ball center. Rebuild the full ball-sized target behind the object ball.
What if most misses are thin?
The ghost ball may be visualized too far away from the object ball, or the selected overlap may be too small. Confirm that the imaginary ball touches the object ball and has the same diameter as the cue ball.
What if left and right cuts score differently?
A large side-to-side difference can point to head position, stance, vision center, or cue delivery—not necessarily the aiming model itself.
What if short shots work but long shots fail?
Small alignment and stroke errors become more visible over distance. Check straight-shot delivery and make sure the player does not alter the selected line after entering the stance.
Which Ghost-Ball Mistakes Should You Avoid?
- Imagining a ghost ball that is too large or too small.
- Leaving a gap between the ghost ball and object ball.
- Aiming at the surface contact point with the cue-ball center.
- Bending down before choosing the shot line.
- Changing aim, speed, tip position, and stance at the same time.
- Drawing conclusions from one miss.
- Adding sidespin before center-ball geometry is repeatable.
- Ignoring throw on slow or high-friction cuts.
How Should Different Players Practice?
| Level | Recommended Approach |
|---|---|
| Beginner | Short cuts, center ball, medium speed, clear ghost-ball placement |
| Intermediate | Complete the 24-shot test and track thick-versus-thin misses |
| Advanced | Change one variable at a time: speed, cue-ball state, then sidespin |
| Coach | Temporarily place a real ball in the ghost position, then remove it before the shot |
The coach's temporary-ball method makes the center-to-center relationship obvious. It should be used as a learning demonstration, not left on the table as an aiming aid during the shot.
Is Ghost-Ball Aiming Perfect?
No aiming method automatically solves every shot. Ghost-ball aiming is a useful geometric foundation, but successful execution also depends on vision, stance, stroke, speed, equipment conditions, pocket geometry, friction, and spin.
The goal is not to see a glowing imaginary ball forever. It is to develop a reliable shot picture that becomes easier to recognize through accurate repetition.
Dr. Dave's broader guidance is important here: there is no single secret system that replaces learning and table time. Visualization can accelerate the process, but the player must still deliver the cue through the chosen line.
What Is the Best Ghost-Ball Checklist?
Use this six-part sequence:
- Choose the object-ball path.
- Find the surface contact point.
- Place an imaginary cue ball at impact.
- Aim the real cue-ball center at the ghost-ball center.
- Enter the stance without changing the line.
- Use center ball before adding advanced compensation.
When misses occur, record thick, thin, or stroke error instead of immediately changing systems. A consistent pattern provides a much better diagnosis than a single failed shot.
Frequently Asked Questions
Is the ghost ball the same size as the cue ball?
Yes. It represents the complete cue ball at the instant of contact, so its diameter must match the real cue ball.
Should the ghost ball touch the object ball?
Yes. In the basic model, the imaginary cue ball is tangent to the object ball at the desired contact point.
Why do I miss thick when aiming at the contact point?
The surface contact point is not the destination of the cue-ball center. Aiming the center directly at that point moves the cue ball too far into the object ball.
Does ghost-ball aiming account for throw?
The beginner version usually does not. Advanced use adjusts the required impact position for cut- or spin-induced throw.
Should beginners use sidespin with ghost-ball drills?
No. Center-ball hits make the geometry easier to test because sidespin can introduce squirt, swerve, and additional throw effects.
What does a half-ball hit mean?
At impact, the cue ball visually overlaps half of the object ball. It creates an approximate 30-degree cut in the ideal reference model.